3D Printed Terrain - Check this Out

3D Printed Terrain - Check this Out

Terrain – 3D printing is all the rage these days. There are some amazing designers selling stuff on Shapeways, super creative generous people that upload designs to thingiverse and a plethora of etsy shops that specialize in table top accessories. In fact there’s so much cool stuff out there it’s sometimes hard to cut through the clutter and find the best stuff.

Read More

Blade Runner-esque City Scape

Blade Runner-esque City Scape

Terrain Building – Blade Runner really set the tone for me as to what a dystopian future would look like. Dirty, crowded and dark. Ultimately that's the look I'm going for with my city table. Ideally this terrain will be "useable" across several different rules sets like 40K, Necromunda and Batman as well as any other random "near-future" sci-fi games I might find myself interested in. 

Read More

Welcome to Chinatown - MDF Terrain

Welcome to Chinatown - MDF Terrain

Terrain Building – Last Christmas I received several buildings from Knights of Dice in their Sentry City Chinatown Range. For some reason I had shelved these with some other "rainy-day" projects. I pulled these out while I was looking for another box and decided to make some time to get a simple paint job on them and assemble the buildings so I can use them for some games.

Read More

Shadow War: Building Landing Pad

Warhammer 40,000 - Terrain is vital to create a immersive game. Miniatures can only take you so far. I've always been a terrain guy, no matter the system I build at least one new terrain set anytime I start anew game. It's been forever since my group played Necromunda so any terrain I had has long since been trashed or donated. While I really like the new terrain kits Games Workshophas put out I wanted to do something different. I still had a bunch of Mantic terrain from the first Deadzone Kickstarter that I never did anything with so I took that, some cans I've been saving, pink foam and some parts from the industrial terrain to build a new battlefield.

This terrain set is going to go on an Alpine FAT Mat that I picked up before FLG and Tablewar went their separate ways. It's a nice thick mouse pad style mat with a beautiful snow/rock print. When I resurface the top of my gaming table I think I'm going to invest in a few of these to replace the textured boards I usually use. Dice roll better on them, they're easier to store and the flat surface makes it easier to place terrain in various positions without getting caught up on some random rock of sand bit.

Once I finish painting all the pieces for this terrain set I'll add some snow effect to the edges of each base to help them blend in to the mat and tie the whole theme together.

The first piece I built for this set is the landing pad. It's primarily made out of Mantic Battlefields panels with a MDF hexagon for the landing pad. I detailed it out with some Games Workshop bits from my bits box and other random resin pieces I've made copies of over the years. (I've found that if I find a cool bit its best to make a silicone mold of it because I'll inevitably forget where it came from or be unable to track down more in the future.)

After laying out the panels in a rough idea of what I wanted to do I used a jigsaw to cut a piece of MDF that I textured previously with drywall tape and cardstock. I then glued pink foam to the base and used a razor knife to carve out the shapes I wanted. From there it's just a matter of gluing the parts in place and painting.

I base coat everything with a Behr paint and primer that I had the guys at Home depot match to the hobby paint I use. The wash is a Minwax water based stain that I thin down 2 parts water to 1 part stain. A base coat, dry brush and wash gets this piece to a playable state quickly and I'll detail it out after I've tested it in game to be sure nothing needs to change.


In the darkest night ... City Scenics from TT Combat

In the darkest night ... City Scenics from TT Combat

Terrain – So I've been bit by the Batman bug (I hope it didn't have rabies.) The idea of a dirty dark city appeals to me (maybe that's why I live in Metro-Detroit) so when I started painting some models for a client for the Batman Miniatures game I started doing some research and found some pretty nice MDF terrain. I know, I know groan sigh more crap that needs to be air-brushed to show any detail right? In fact sir that would be where you're wrong.

Read More

I need a drink ... Burn In Designs El Tarasco

I need a drink ... Burn In Designs El Tarasco

Terrain Review – Awhile back I picked up the El Tarasco Bar from Burn In Designs. This is a cool laser cut MDF kit that is part of his Old West Rock Ridge line. I'm not going to be using it for that but will rather use it as part of my desert board as a random back water outpost. 

Read More

XYZ 3D Printer ... Dumpster Printing

Terrain Making – A while back a friend was kind enough to gift me a 3D Printer, up until recently I haven't had time to really do much more with it than take it out of the box. (Initially the issue was my old ass Mac wouldn't run the software which turned into not having time to mess with it). Last weekend I finally got it up and running and downloaded a few designs from thingiverse.com to try printing.

Read More

Come into my room ... more bug hunt

Come into my room ... more bug hunt

Terrain Making – Next up in my quest to complete this giant terrain set are a few of the standard side rooms. These attach to a corridor section and swap out with the narrow side rooms (for if you need to put a bunch of rooms next to each other.) Painting these uses the same technique as the other sections which you can read about here

Read More

We're going on a Bug Hunt ... WIP Corridors

We're going on a Bug Hunt ... WIP Corridors

Terrain Building – I recently picked up the roofs to match the Bug Hunt Corridors terrain that I kickstarted a while back. Because it was a limited time deal I felt I should get them so I can use the terrain set for more than just the inside of a ship or building complex. With the roofs added they can suddenly be used as freestanding building in their own right which opens up their use in big games of Warhammer 40K, Relic Knights, MERCS, and other sci-fi games.

Read More

101 Things to Do with Craters #2

101 Things to Do with Craters #2

Terrain Making – I finally had a chance to get back to the series I started a few weeks ago. As I mentioned then I have a mold I made for craters back when they were a thing needed for Warhammer 40K. As such i don't want it to go to waste so I'm working on various terrain sets that use some or all of the crater to create unique items from a common mold.

Read More

101 Things To Do With Craters ... Terrain Thoughts

101 Things To Do With Craters ... Terrain Thoughts

Terrain Building – So back in sixth edition 40K I made a crater and created a mold of it so I'd have something to represent all the exploded rhinos and other vehicles on the table top. Now seventh edition doesn't leave a crater when vehicles explode so I have to figure out something to do with all the plaster casts I made of my crater. Perhaps I can do a "101 Things to Do with Craters" series of articles.

Read More

Go Big or .... Near Future 4'x6' Board Progress

Terrain Making – After making the initial 3'x3' city block board with 3"x3" squares I decided that I needed to go all out and do a 4'x6' table. Between the two smaller near future boards I've been working on I have enough buildings to populate a larger area. I've always wanted to do a full city so I decided now is the time to do it. Having been successful with the smaller board I have a good grasp of what works and what doesn't. I made a quick trip to Home Depot to pick up a 1" thick sheet of insulation foam to act as the topper for my 4'x6' table. A quick stop at Michael's for some clean sheets of foam core and I was ready to go.

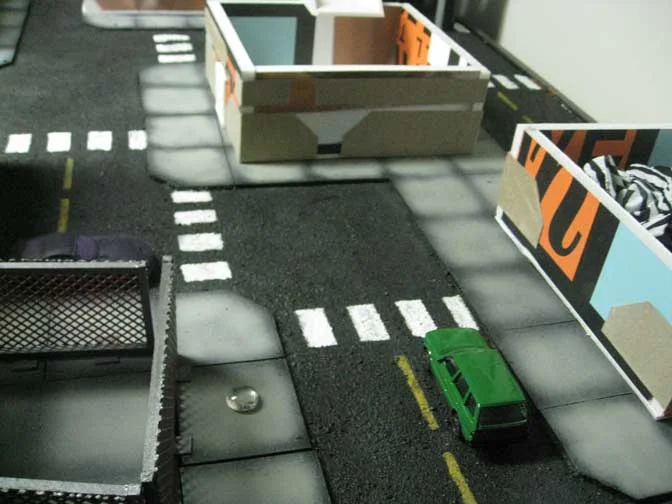
After trimming the insulation foam to fit within my tabletop I then measured out a 3"x3" grid over the entire surface. Once the grid was in place I moved the buildings I have around on the board until I was happy with the layout. My goal was to have some straight road sections without have a clear shot straight across the board. From prior experience, city blocks set up on a standard grid make for boring battlefields as their are to many "kill zones" that allow over watchers or snipers to control to much of the board. With the layout I settled on there are enough blind spots to offer cover from the various sniper nests.

The tedious part of the job took me two nights of cutting 3"x3" squares of foam core. While I probably could have just painted the grid on to these I find having the physical separation of the individual blocks to be more visually pleasing. Once I cut them all to size I set off with a large bottle of tacky glue and began gluing down the foam core to the insulation foam base. This process took another night of tedious work but the final result fit exactly what I had in mind.

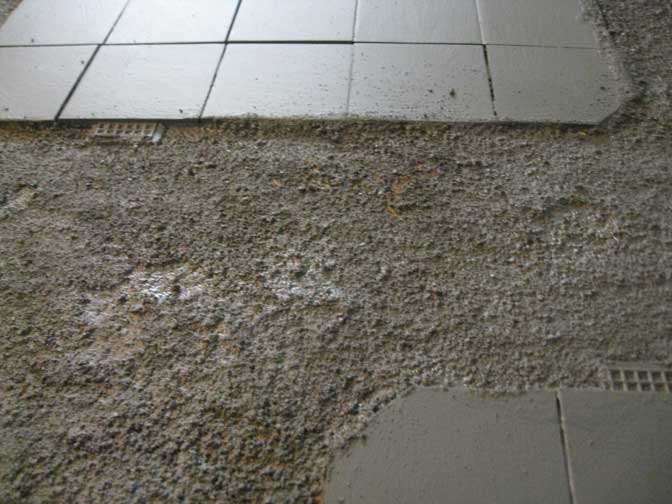
I then cut out storm drains from granny grate and glued them in place at various points along the street sections. Little details like this help to bring the whole city to life. I opted to not include sewer drain covers at this time. I may change my mind before painting begins but right now I don't think I want to add them.

Once everything had dried overnight I took the sheet out to the garage and began applying the sand texture. For this I use a gallon of wood glue. I've found that wood glue adheres to the foam pretty good and dries solid enough to withstand the rigors of gaming. Working in sections I paint the glue down with a wide brush and then liberally coat the glue with sand. More is better at this point, you want to have the sand piled on thick enough so it will sink into the sand and give you the texture you want.

After this dries for a few days (you have to be sure the glue has set otherwise you'll get weird marks in the final texture) I use a shop vac to remove the excess sand. If you're smart and clean the shop vac prior to vacuuming the sand you'll be able to salvage the excess for the next project. 

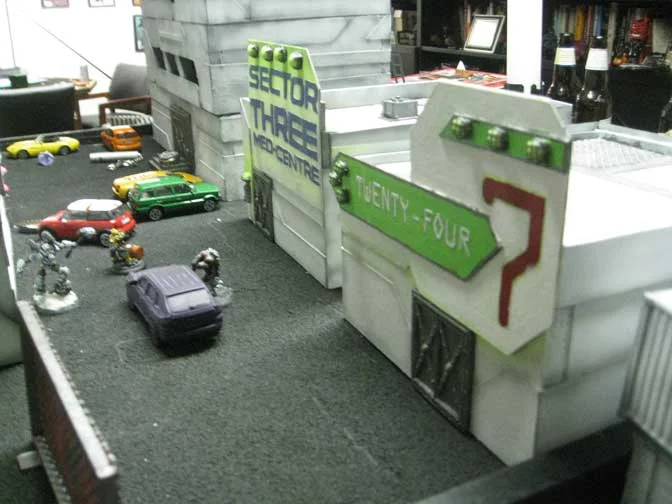
After everything dried I painted the whole board with Behr Premium Paint + Primer. I find this covers well, is durable and comes in colors that match my other paints. After the base coat I went in with my airbrush and painted everything else. Starting with black I slowly worked up highlights to get a decent transition for the concrete slabs. Overall I'm happy with the results thus far.

Paving the Way - City Block Painting

Paving the Way - City Block Painting

Terrain Making – I seem to be getting better with the airbrush, after the primer dried on the 3x3 city board I went in and air brushed the city streets and the the blocks. The trick is to apply the paint in layers starting with the darkest and then building up to get a smooth transition between colors. 

Read More

3x3 - 3x3 - 3x3 - 3x3 - 3x3 ...Repeat

Terrain Making – While I love my 3'x3' Zuzzy mat I decided to build a 3'x3' base board to go with this near future stuff (Ideally I'll also be able to use it with Deadzone). I used the same wooden framework and insulation foam core as I've done with my Malifaux boards.

While waiting for the caulk to dry I started cutting out 3"x3" squares to build the city blocks for this board out of 1/4" foamcore. With small sections I don't think I'll run into a warping issue with the foamcore but just in case I applied my glue generously.

I figure using 3"x3" squares to build the foundations will give me an interesting look that serves the dual purpose of creating a grid for Deadzone. (As I've said before with the amount of games I like to play making the terrain as multipurpose as possible save me some space.) The 3"x3" slabs of concrete will also help to create a sidewalk for the various buildings as well as clearly define the roadway.

After glueing the squares into city blocks and defining the streets and alleyways, I cut some drains out of granny grate and glued them down onto the street. Once that had dried overnight I used some wood glue and play sand to texturize the street. With the high humidity this took quite a bit longer to dry than it normally does.

While waiting for the glue to dry I started cutting the basic shapes for more city buildings. The last few I made didn't fit into the parameters for Deadzone terrain exactly so I decided to make some additional buildings that match up with the grid. I kept 3.5" high as my standard for the height of A floor of a building and kept all the lengths multiples of three. They seem to work pretty good and I'm considering adding several stories to each of the buildings. 

To paint the whole thing I picked up a quart of Behr Premium Paint and Primer in a color called Pencil Point. This is a nice deep gray that only requires one coat to cover and improve overall adhesion. I like how thick the paint is as it helps to fill weird gaps and seal the sand to prevent chipping.

More Airbrush Action - Near Future Terrain

Terrain Making – I'm getting the hang of using the airbrush with the second set of buildings for the Near Future board. It seems that consistent pressure and paint gives a smoother finish than short controlled bursts. Which is odd because it goes against everything I've been taught but hey ... whatever works.

After lining the seems with a dark gray I went back in with a white to do the bulk of the painting. I think both buildings took me less than twenty minutes to cover with a solid base coat with basic shading. 

Next I went in and painted the details with a traditional brush to pick out signs and metallic parts. My plan is to go back in and add some glow effect with the airbrush around the light globes.

Let's Go Shopping ... More Near Future Terrain

Let's Go Shopping ... More Near Future Terrain

Terrain Making – With the exterior of the two larger structures in a playable state I've moved on to building some smaller buildings to fill in the board. On a 3'x3' including all the structures might make for a cluttered board however in small scale skirmish games cover is key to a good game. Without it you'll fall victim to the sniper on a roof more often than not.

Read More