Who let the dogs out?

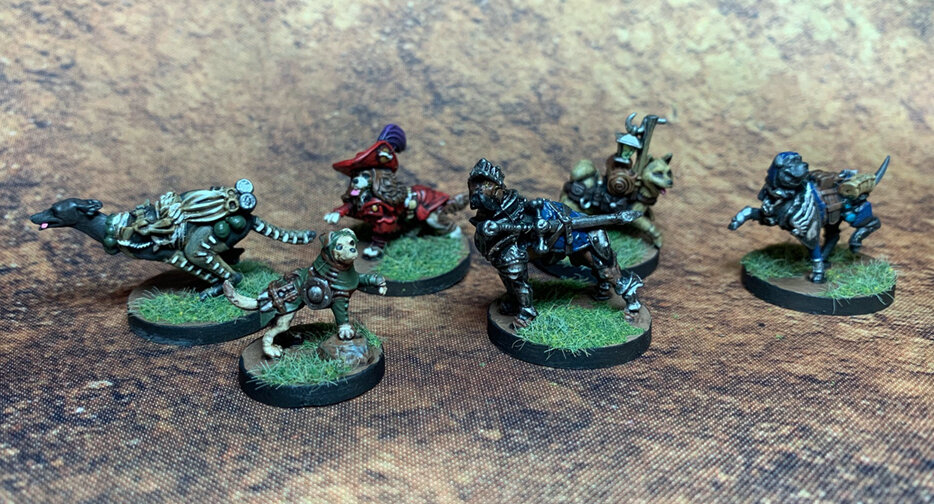
Role Playing Dungeon Doggies are a cool set of alternative miniatures to use in any miniatures agnostic fantasy game. So if you’ve had your heart set on playing out Oliver & Co. or the Incredible Journey, you totally can. Or if you just want to annoy your GM and play a Scooby-like talking dog, well go for it.

I enjoyed painting these. The models are pretty well detailed and the sculpture took the time to think out how some pieces of armor might work on a dog. They also made sure to accurately represent the various breeds which of course meant I had to do some research to make the paint match.

These were originally part of a Kickstarter but are now available from Steamforged Games. Shown here are two complete sets of the three boxes available. Several of my clients have picked up the miniatures so I imagine you might see more of these soon.

Reaper Bone 3 Delivers

Reaper Bone 3 Delivers

Kickstarter – After some minor delays the Reaper Bones 3 Kickstarter arrived. I didn't go whole hog on this one as I don't play D&D I don't really need a boatload of Fantasy models, even if it's an amazing deal. While this was running my group was playing quite a bit of Frostgrave however, so I did pick up the Graveyard set to fill out my board.

Read More

Trimming it out ... Frostgrave table

Trimming it out ... Frostgrave table

Frostgrave – I had a little free time to do some additional work on this table. For the buildings I was going to do a Tudor-style face but realized that the Ultra-board I'm working with is rather difficult to carve stone into. I'm sure I could do it with my Dremel, but the amount of work compared to the payoff didn't seem to be optimal.

Read More

Feeling a Chill ... Frostgrave is calling

Feeling a Chill ... Frostgrave is calling

Frostgrave – I never really got into Mordheim, the game seemed interesting but Warhammer Fantasy never appealed to me. The buzz about Frostgrave got me interested in the game. My wife gave me the short story compilation for Christmas and while it wasn't mind-blowingly good it was interesting enough to convince me to spend the $18 to get the rule book.

Read More

By the power of Greyskull ...

Malifaux – Yes I know this is a kit for Warhammer Fantasy. No hell did not freeze over, I haven't started playing that game. When I saw this kit I immediately thought of Nicodems Observatory from Rising Powers. Of course shortly after that I though of He-Man. Then I looked at the price and giggled. Much like most of the kits from GW the price is higher than average but you are getting a nicely detailed hunk of plastic with optional parts (and skulls everywhere). 

Unboxing the kit you have two solid parts for the base and a few sprues with the rest of the details. I could see using some of these parts in other projects and will probably check some bit sellers to see if they have any extras. The instructions were very detailed and easy to follow and the kit went together smoothly. In fact I think it took me more time to remove the mold lines than it did to assemble the entire kit.

I opted to leave the observatory and tower ramparts unattached so it can serve a dual purpose. Other than that minor option there aren't any extra parts in the kit. Which is a bit disappointing as most GW kits have a ton of extra stuff that can be used other places.

Overall I'm happy with the kit. It looks imposing on the field and takes up a decent amount of space. I'm slightly disappointed with the number of places models can stand on the piece, for some reason I though the stairs and broken walkway were larger than they are. Combining this with some Citadel Trees, Wyrd Hanging Trees, and two Garden of Morrs should be more than enough terrain to fill a 3'x3' graveyard themed board. I know I could probably build all of this for way less and have it look just as cool, however I'm experimenting with the durability of these plastic kits. Dragging my desert board back a forth from the game store every week has exposed some of the minor flaws in scratch built terrain. Granted three years of constant use and shuffling is pretty solid for a terrain set I want to see what I can do with some solid plastic kits.

Diceless Dice? You gotta have these.

Ok so this Kickstarter thing is pretty crazy. I'm a little bummed about the timing of some of these bigger ones and the wait from kick to product in hand is agonizing. 

That said I came across this little gem. That's right never again will you be caught without dice. Just slip them on and you're good to go. I think having the D6 one with pips would be a classy way to proclaim your gamer pride but the life counter one seems like a must have for MTG players.

I can't wait to come across a 40k player with 20+ rings on their hand trying to spin for rapid fire.

Paid in Full: Commissions - How much is your time worth?

Random – Lately the number of inquires I've recieved about commission work has dramatically increased. Many of these questions have been about how to determine a price when doing commission work. So in an effort to answer these questions for the larger population, here's the basic principles I use when putting together a quote.

1. How much is your time worth? When considering doing "craft" projects that you intend to sell to others the first thing you need to consider is how much is your time worth. For the most part you're not going to make $16-$30 an hour painting models or building terrain. Even when painting to a Golden Daemon or Crystal Brush winning level the amount of time you put in usually won't equate to "real job" money. Most gamer's won't pay more to have a model painted then it cost them to purchase so keep that in mind when putting together a price. Also remember if you have a wife and kids or girlfriend your hobby time is probably limited. When I started this site I was between jobs and had much more time to build and paint stuff. Now my time is limited so it's important I enjoy every project I take on and be as efficient as possible so I'm not working for pennies an hour during my free time.

2. What are your material costs and how do you recoup them? Paint, primer, glue, sand all cost money. Good paint brushes and glue cost more. While it can take a while to burn through a pot of paint, you have to consider the costs when figuring your price. One thing I've instituted is buying new pots for army scale projects and billing them as a line item. Once you're done with the project your can give the remainder to your client in case they need touch up or add models they don't need or want you to paint.

Terrain Projects can get tricky as sometimes you use found materials and other times you need to buy foam and other raw materials. Most of the time you're going to buy in bulk and have a bunch of stuff you need to store. If you have limited room you might need to invest in space to store that stuff. Right now I'm not quite at that point but it's getting close.

3. What are your customers expectations? This is a big one. Some customers just want a three color minimum. While other might ask for table top quality expecting to be able to enter them in a juried contest. Managing those expectations and delivering as promised is huge. I've heard many horror stories from painters about unreasonable clients that make requests well beyond what the initial request was and then want to pay less because the quality is what was expected. On the flip side I've also heard numerous stories of painters that send over a quick shot of the base coated model only to have the client "love it and want to know how quick it will ship." That second one is rare but important to remember as some clients dont' want you best work. They just want some color on the models. Knowing this you can save yourself a ton of time.

4. How are you going to get it to the client? Nobody considers shipping costs. One more then one occasion I've  had to deal with customers complaining about shipping, "DUDE the flat rate box is only $5, why does it cost $20 to ship to me in Antarctica? You're trying to RIP ME OFF!" You also see this all over several companies forums. The reality is shipping is expensive, foam and packing materials are expensive. Tracking and insuring packages is expensive. And even it you do everything right the post office, UPS or Fed Ex will inevitably screw up on a one-of-a-kind rare product. It happens, sending boxes across the country or world has risks. Most of the time it's not an issue but when it is will be the one time you didn't insure or track a package. C.Y.A. 

While the post office and FedEx provide free boxes the packing material is not free. Even cheap foam is a $1-$5 a yard minimum. If you're shipping painted models wrap them in foam and pack them well. Otherwise it's likely to be damaged during shipping. For an order of several models you can quickly burn through a large amount of foam and tape. So figure in the cost of shipping and add a few dollars to cover packing materials otherwise it will eat into your already tight bottom line.

5. Don't get burned. When painting models this isn't as big a deal as if you don't get paid keep the model and resell it. So long as it's nothing to obscure you should be able to get at least 40-50% of the retail cost, more if you're willing to wait. But terrain projects are another beast entirely. Custom terrain is hard to sell once its built. Particularly if it's custom to specific client. After getting burned a few times I put forth a 50% nonrefundable deposit. That way if I have to go buy a bunch of supplies for a project I'm not going to be out of pocket if the client changes their mind or "is broke this month bro."

6. Be transparent. Have examples of your work and the various levels of quality and pricing tiers available. Put them out there for the work to see. Eventually people will start to connect with your work and ask about pricing. For example for a table top quality miniature from a skirmish game I typical charge by model size: 30mm - $8-$12; 40mm - $10-$15; 50mm - $15-$30. This gives a good starting point. But for an army level game it's unlikely you'll get that much per model. At this point most people want a "lower table top quality" which falls more in line with the 25mm- $2-$3, and goes up from there.

For terrain projects it helps to come up with some designs you can quickly replicate and make a bunch of them at once. Assembly lines are good for managing time and if you make something that can be used for several systems you diversify your client base. For example the swamps I sell in the online store I typically make 6-10 of them at a time. Since they use water effects it's better to mix a larger pot of it and pour all at once than to make small pot and have a bunch of waste. Having an existing stock also lets you focus on other projects and have a reference point for custom orders.

Being consistent helps you to manage your time and be able to quickly quote a price to a potential customer. I hope this answers any questions for aspiring painters and potential clients.


Brown Black really? – Step by Step Library Board (Part Four)

Relic Knights – Continuing my progress on this library board I've gotten some of my bookshelves assembled and smoothed out. Gluing them together I ran into some issues with gaps and shelves that are slightly different heights. I used some Dap spackle to fill these in.

After sanding them smooth, it time to paint. I found a dark brown satin finish spray paint to do the base coat. I have this crazy idea that the book shelves should be the same color as the Ikea book shelves I have in my game room. The problem I have is: What color is black brown exactly? It's not really a color at all at first glimpse it seems like I could take in in and have it color matched at Home Depot, unfortunately the effect seems to be from layering two colors so you get hints of brown when the light shines on it.

My solution was to spray them with a dark satin brown and then apply dark walnut acyclic wood stain. This did my basic shading for me and brought the color closer to what I was looking for. I'll tweak it more as I move into the detail painting of the shelves.

With the sections I've base coated so far I have a pretty decent area of the board covered and once I add in some statuary I think it will start to look more like what I've envisioned in my head.

Shelved - Step by Step Library Board (Part Three)

Relic Knights – With the basic board done it's time to populate it with terrain elements. I sat down and did some sketching to plan out what it is this board will need to feel like a library/school. Usually I don't really sketch anything when I'm building terrain as I like to play it by ear and build what I see looking at the parts I have to work with.

While that system has worked well for me in the past it also have some drawbacks, namely not having a solid plan means some projects just go on forever. I've also run into the problem of playing it by ear and having a piece that looks great but is impossible to store. 

After doing some thinking I decided that I will need several elements to make this board look and feel like a library. I also came up with some optional elements to make it feel more like a school, anytime a board can pull double duty with minor tweaks you should include that in your planning.

BOOKSHELVES – I decided the primary terrain element for this board is going to be various bookshelves. To make the best use of my time I decided on several configurations that could be easily repositioned to create a new layout and were small enough to be easily stored. I settled on a single-stack L shape, a double-stack L shape, a single stack S shape and a few straight sections.

STAIRS - I'm still looking for some inspiration on these. My first thought was to use wooden balls and build the stairs going around them. I think that could look mystical and cool, but I'm afraid they won't have enough height. I've been looking at using a tube and ringing the steps around that to give some more height and provide someplace for snipers to nest. 

STATUES - I need to find some cheap Egyptian style statues. I see this more as a library/museum of mystical power and history so incorporating some statues and other relic type items will give more scatter terrain and add a bit more character to the table. While the bookshelves I found are really cool a table of nothing but bookshelf is going to feel like a simple dungeon.

ARCHES - To help give the feel of being in a massive structure I'm considering building some arches. These will provide some more interest areas as well as some minor cover for long hallways. I'm not 100% sold on the idea yet but will  probably at least build one to see how it looks.

Here's the optional stuff. To try and get more life out of this board I'm considering adding some school elements.

DORMITORY - Essentially the idea would be to create some rooms (or walls) that can divide up sections of the board into rooms (essentially buildings on something this big). I have some beds that will make a good dorm room, they're just over 1" high so it will be a bunch of light cover in a small area that could be interesting.

LOCKER ROOM - I'm not sure about this one. On one hand I think it could be fun to build on the other I don't know how functional it will be in game terms. I'm going to revisit my sketches before I try to build anything.

BOILER ROOM - This will be easy a room full of pipes and techy looking things. Gives me the chance to pull in some additional sci-fi elements and add some grime to the table. I'm not sure it's necessary yet but as an option I like it.

STAGE - Most schools have stages for presentations and talent shows. If I build one this could potentially serve double duty as the Star Theater for Malifaux. Not sold on it yet but we'll see.

Building a Brothel

Malifaux – The downtown board I started a while back is looking pretty bare. Having found a little extra time I decided to revive this project and begin building the individual structures. Looking at the overhead view of the table, I've identified (5) sections that require structures to look complete.

(A) Central multistory structure – This will be the brothel, I'm going to base this while section of town on the Red Chappel District so it makes sense for Seamus to have a safe house in the area. This building will cover the two levels of the board. I'm not going to detail the interiors, but will add some balconies for model interaction.

(B) City Block 1 – This with be several store fronts connected with a catwalk/balcony. I'll have an alleyway or two with stairs leading to the next level.

(C) Bridge – Will connect the two halves of the table to increase interactivity between the various areas.

(D) Dockside structures – Similar to the store fronts up top this will flesh out the lower street level. 

(E) City Block 2 – This with be several store fronts connected with a catwalk/balcony. I'll have an alleyway or two with stairs leading to the next level.

As the central structure is going to be a defining piece for this table I decided to start there. After taking measurements, I cut some gatorfoam to shape for the walls of the structure. Using some glue and pins I put together the walls, and dry fit it into place to be sure it fits snug into the gap. 

After the base structure drys it will be time to add some detailing. I like the idea of a Tudor style building mixed in with the look of the old Mordheim terrain. I happen to have a bunch of the corner pieces that will help add some additional texture to this structure.  The timber and plaster look will mesh well with some more modern looking brick and stone stuctures to indicate the rapid growth and renewal of Malifaux city proper. 

Red Chapel District (Downtown Malifaux Part 3)

Malifaux – Having cast up my road sections and some brick wall section I've begun the time intensive portion of this project. I probably would have better luck if I made my road sections with notches to fit together like a jigsaw puzzle. However I didn't and am going to have some serious gaps to fill in. I think ultimately this is going to strengthen the entire project (as well as subtlety add no slip areas).

While waiting for the resin to set I decided to begin adding blocks to the board. I like the idea of a city built on a city on a city, which according to the fluff so far seems to be the case. The newer areas are built from renovated old buildings or simply built on top of the existing structures. I imagine it to be like Jerusalem or another ancient settlement in which multiple cultures have occupied the same area over the course of centuries. 

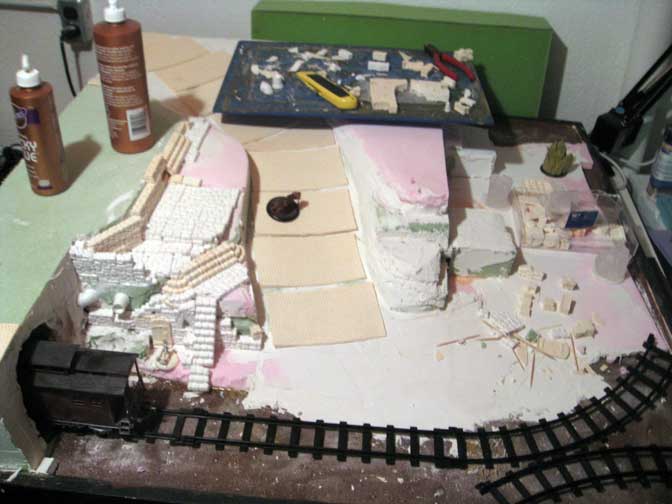
With that in mind I began adding flagstones and fieldstone walls to one area. The fieldstone is going to represent the older structures and or buildings cobbled together from existing material. I'm going to use the gothic stones for new structures like the train tunnel and bridges. Hopefully I'll be able to make these work together and not look like a jumbled mess.

The first area I've been working on is the stairway along the main street. As this leads down near the tracks I wanted to create a maintenance room. This could lead down to the sewer or just serve as an area for rail workers to rest. I imagine small rooms like this throughout the city hidden in forgotten places server as hideouts for near-do-wells, the poor and forgotten or laborers. 

I've also decided that the buildings will not be permanently affixed to the board. Dragging it back and forth from my garage to basement (for sanding etc) I learned that I can't go much higher with the board and still be able to go up my narrow stairwell. I'm really glad I didn't block in the buildings before learning this. So now my focus is to build the basic board and texture it appropriately. This will allow me to swap out buildings and build a ruined version of them to represent the Slums and Quarantine Zone as well.

Choo Choo Catchu ... Tunnel of Love

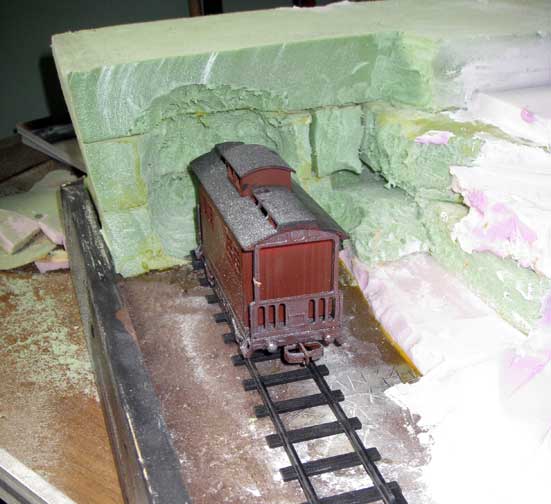
Malifaux - Having sanded down the rough shape of the downtown streets, it's time to work on the actual plan and making it work. I want to add the train (which is still unfinished...) that I was working on for a possible Breach location (lost interest in that project ... for now) to this project. As I fleshed in the rough shape of the mountain/hill I left an area for a tunnel. 

To build the tunnel I'm using the Hirst Arts gothic bridge mold. This mold can create a nice arch which will serve as the tunnel opening. 

Before I can build the tunnel however I need to blast out the interior. So out comes the trusty dremel to bore out the tunnel from the green foam block. You're probably wondering why I didn't just cut the arch out of the foam before I glued it into place. Well there are two good reasons: 1. I'm trying to create this board in a somewhat organic way so that it feels more like the city filled in around the existing terrain (in other words I didn't have a solid plan and got impatient) 2. By building a solid block to begin with it should in theory be stronger than if I had cut a glued an empty arch into place.

The question that come up next is do I bore al the way through to the other side or do I make it a faux tunnel that isn't functional. As the "bridge" over top is about 6" wide I don't think making the tunnel functional is going to have much effect on game play as it's to wide to comfortably move models under. However if it goes all the way through there is the coolness factor of having the train coming through the tunnel.

Ultimately coolness wins out. My initial though was to smooth and finish the sides of the board edge to match the black base, but I think it's potential more of an enjoyable experience to see the edge of the board as rough earth. Maybe...

Downtown Malifaux - Stage 2

Malifaux – I'm getting ready to move into stage two of my downtown board. I still have several other items that I'm going to need to cast and/or sculpt but I'm getting antsy to start the larger portion of the project. 

Because this is going to be a fixed terrain board I need to do some prior planning before moving ahead with it. A few rough sketches give me the general idea of how I want the board to lay out. I'm not going to go into detail with the buildings at this point because I'm more of a hands on visualizer.

I have a base board that I built previously, I was never really happy with the way it turned out so rather than build a new base I'm going to reuse this one (much like a painter with a canvas). Step one is to build up the elevations to fit what I'm envisioning.

The goal is to have a gently sloping winding road traversing the center of the board. One side of the board will be a higher elevation than the other and I want to work a railroad tunnel into that side of the board as well. The far side of the board will be at ground level with a number of staircase in the alleyways. 

The trick is going to be fitting everything I want on the board while maintaining playability. I'm not sure if finishing the building interiors is going to work or not. While I'd love to detail out each structure interior it seems like it may make the board more difficult to use. From past experience lifting a level makes things shift and slide. 


Downtown Malifaux - Stage One ... Revisited

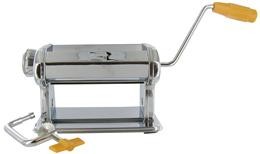
Malifaux – So I came to the realization I suck at using a rolling pin. After several attempts I've broken down and bought a "craft" pasta machine. Luckily as was able to pick it up for 40% off retail and I think I'm going to get quite a bit of use out of this tool.

While I was at the craft store I also picked up a brick of sculpty to try out with the machine. I'm a little nervous that milliput or greenstuff will get stuck in the machine. 

Working the machine is simple enough you set how thick you want the clay, stick a blob on top and turn the crank. Voila perfectly uniform flat clay. Of course there's a bit more to it than that but the basic idea is that simple.

So now that I can produce uniform flat sheets of clay it's time to go back to the drawing board and create the cobblestone sheets. I used the same technique as before, bent pipes to create the bricks. Patience is key as if you screw up the pattern you'll wind up starting over from scratch. After two tries, I slowed down and got the results I wanted.

After baking the clay for 15 min. it's ready to mold. Well, almost ... the baking/cooling process caused the edges to curl slightly. So I stored the dry baked sheets under a stack of old text books for a few days to eliminate the curl. 

Next the master for the mold must be glued down to the casting box to prevent it from floating up during the molding process. Because this is a large flat surface area the odds are it will float in the silicone mixture so to save myself from that potential headache I'm going to be sure to glue this down to a sheet of plasticard the exact size of my mold box (a 5x7 acrylic box frame)


Downtown Malifaux - Stage One

Malifaux – After this year's family vacation I have a boatload of inspiration images for the next big project I'm going to do. My goal is to build a super detailed fixed board based on the town of Eureaka Springs, AK. During my visit to the town I was really impressed with the cramped vertical feel of the town. I think it will make for an interesting game board. I've been leery of doing a fixed terrain board since the tend to get boring after a while. However I think I'll only bring this one out for special events or con demos. 

This time around I'm going to plan ahead and build all the individual components before I begin.  I want the cobblestone to match the bases I've used for my Ressurectionist forces, so first things first I need a way to create lots of cobblestones that can be used for the street. Having learned my lesson with the sewer board, I ruled out cutting individual stones. The process was far to time consuming and won't give me exactly the look I want.

So off to the craft store. After looking around at various options that might work I settled on some brass tubing. The tube is of course a tube, so I had to carefully bend it into a rectangular shape. I did this with two different size tubes so I could create some variety in the pattern. 

I then mixed up some miliput (apoxy sculpt might be a better choice but this was 40% off) and roll it out into a large smooth flat area. Once that's done it's a simple matter of taking the tube and pressing the pattern. Repeat until the area is covered.

This didn't work out as well as I had hoped so before I move on I need to research a better way to flatten the putty. I think a clay roller might work ... unless we have a pasta maker lying around.

Once I solve the flatness issue, the next step will be to cut this into squares (or a large section) and make a mold. This will allow me to quickly duplicate the process to cover the streets. I'll also create some optional pieces to create more interest like man-hole covers and grates. 

Undead Horses, couldn't drag me away

Malifaux – A while back I picked up some undead horse from Reaper. I intend to use them for a special "Doner Party" Scenario. They also look pretty cool pulling the supply wagon, so I think I'll get some use out of the models. I based them the same as the rest of my Ressurectionist models with a Victorian-style cobblestone base. I'd probably be better off putting them on a wasteland or ice base for the scenario, but I'm all about getting multiple uses out of a model.

To paint the horses I started with a base of Deneb Stone, from the foundation line. I then did a wash of Ogryn Flesh followed buy a wash of Leviathan Purple. This created the bruised flesh color I wanted. I then mixed up a light beige highlight color and applied that to the model. And followed that with a light Sepia wash. After some minor highlights the skin is complete. 

I painted the muscles and exposed guts with a deep crimson and followed that up with the same washes as above. I'll go back in a add some of my "any color red" highlight and a touch of gloss varnish to finish up.

The hair was painted with a dark gray followed by a black wash. (easiest way to paint black IMHO).

It's so clear now...

I've begun experimenting with Crystal Clear casting resin. I was inspired by my friend Dave's (nerdelemental) current ice pillar project and decided to work on something similar. Dave was experimenting with using Envirotex Light to make casts which turned out really cool.

Snatching up his idea I visited the local plastics/SFX supplier to see if there was a material that might work better. They suggested trying Smooth-ons crystal clear series. To be honest looking at the giant red sticker on the box warning about toxic fumes I was a little nervous. The salesperson assured me it wasn't as difficult to work with as it seems, so I picked up a trial size to test out.

According to the box it's best when the material is less than 3" thick. My mold for Ice Pillars is pushing the limit but I figured why not try it out. Worst case I ruin my mold and have to make another one. At the same time I go out the mold I created for my rock bases to see what type of effect I could get.

Mixing isn't quite one to one so it's recommended to use a scale. Also it's important to gently stir the product to prevent bubbles. According to the instructions it takes 16 hours to cure. I found I could pop them out after 10 hours but they are a bit tacky. Lesson learned: put the bases on wax paper or some other nonstick surface the yellow bits are from a cardboard box I set them on ... doh!

The end result is pretty cool and I think I might offer them up on the online store once I work out the kinks in casting. 

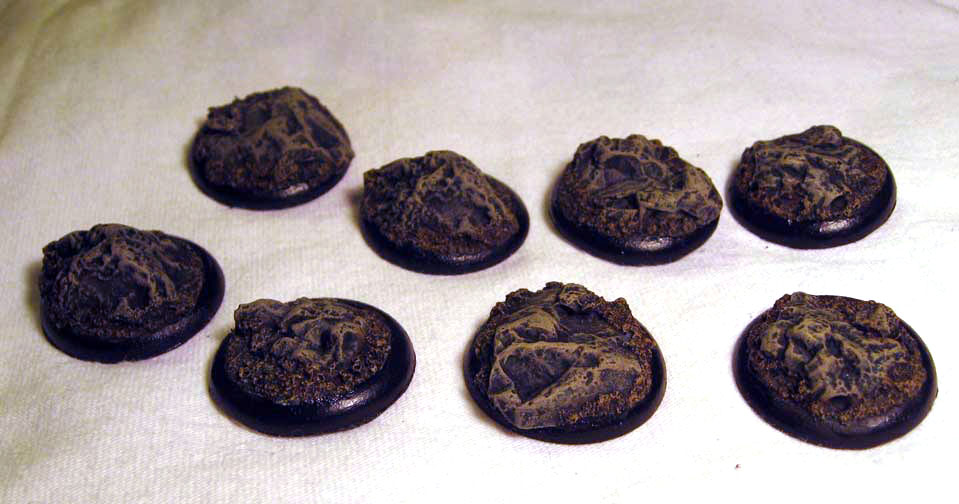
Now Available – Rock Bases

I'm proud to introduce the next set in my line of round lipped bases, creatively titled

Rock Bases. These are great to represent a mountainous region or to add some height to a model. There are several variations in each size with bases available in 30mm, 40mm and 50mm. 

The realistic texture was created using actual rocks. Cast from a urethane resin they're much easier to pin models to than real rocks and much lighter.  

Now Available – Twilight Emporium Bases

After shopping around for bases to use on my Hell Dorado miniatures, I gave up and decided to create my own. My problem was I wanted something with lots of skulls on the bases but I also wanted a rocky surface to mount the miniature to. It seems like most manufacturers make skull bases that consist of a bed of skulls.

After spending the weekend sculpting and crafting bases that would suit my purposes, I decided to make a mold and cast them myself. Now that I have a mold that will last for quite a while I'm going to start offering round lip base sets in my online store